Dear Readers,
In this article,we will see
- Create a role and attached source “EC2” and Destination “AmazonS3FullAccess”.
- Launch one instance and assign this role to the EC2 instance.
- Connect to Linux server through putty.
- We can manage S3 bucket through role instead of giving credentials.

Roles
- Instead of giving credentials we can use roles.
- While creating a role provide some permissions based on permissions we can manage aws account.
- Role is a replacement for credentials.
First, we need to AWS Console page by using below link.
https://aws.amazon.com/console/
Click on sign in to Console button.

Logging to aws account
Provide username and password then click on sign in.
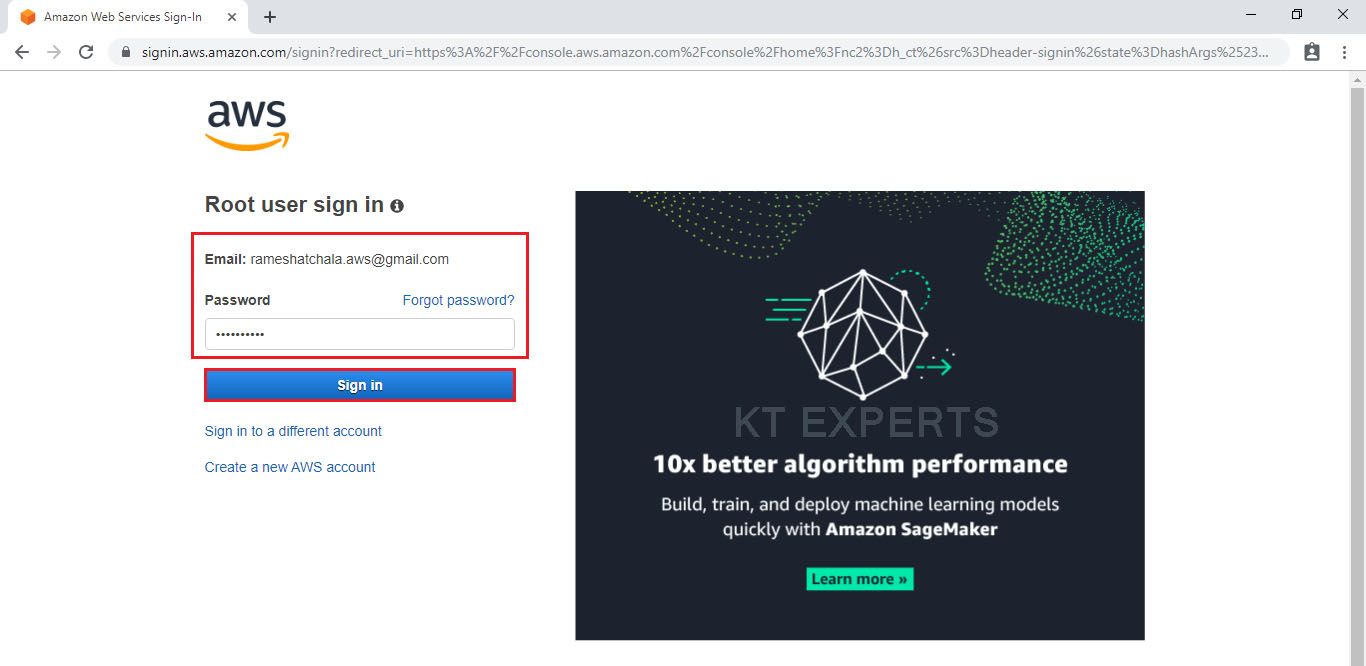
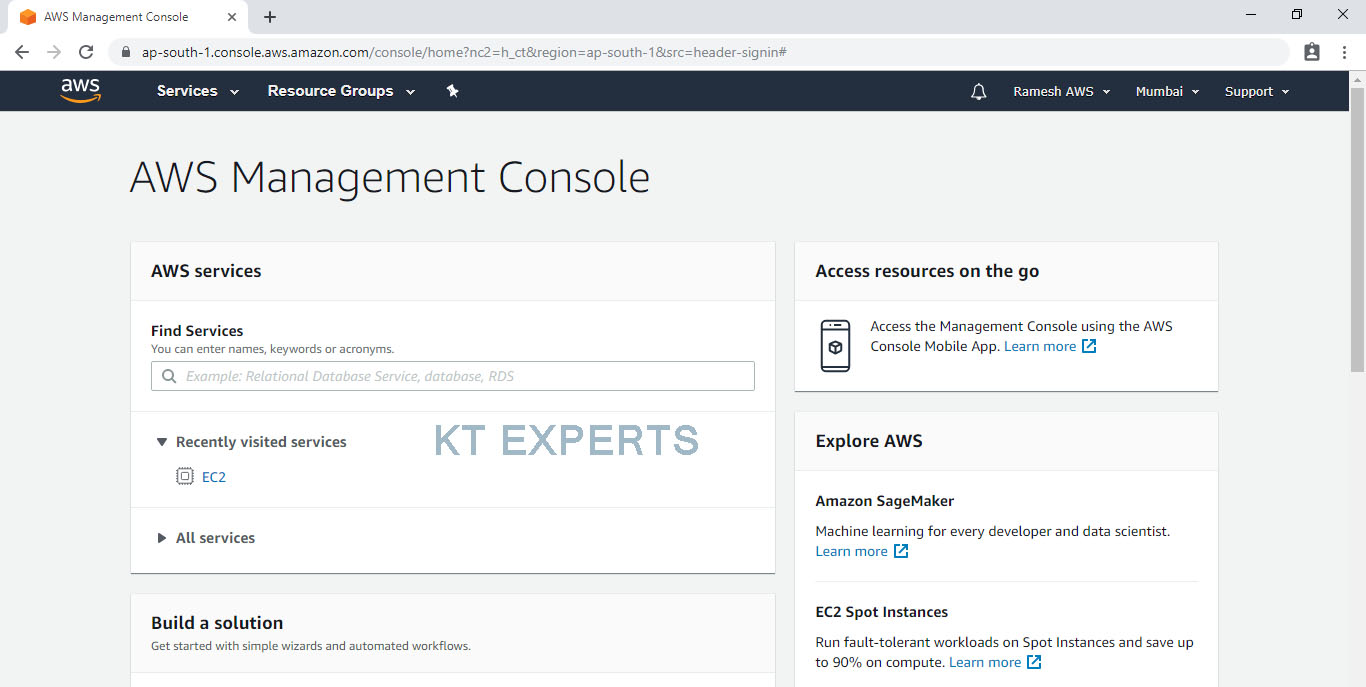
Enter to AWS Management Console
We can see the AWS Management Console Dashboard.
Create an Role
Go to services and click on IAM under Security, Identity & Compliance.

Go to Roles and click on Create role
By default it will show some roles.

Choose Source
Choose EC2 service and click on Permissions.

Provide Destination Permission to the role
Select AmazonS3FullAccess by searching S3Full in search bar and click on Tags.

Click on Review.

Specify Role name “My Role” and click on Create role.

The Role has been created successfully with the name of “My Role”
In this Role Source is “EC2” and Destination is “AmazonS3FullAccess”

Launch an EC2 Instance
Go to Services, under the compute module click EC2 service to open.

Create and Configure a Virtual Machine
We can see EC2 Dashboard by default one security group is available and click on Launch Instance.

Choose an Amazon Machine Image (AMI)
Select the Operating system of the EC2 instance by choosing any of the Amazon Machine Images (AMI).
Select the Microsoft Amazon Linux AMI.

Choose an Instance type
Choose the Type of instance depending on your requirements.
Instance types comprise of varying combinations of CPU, memory, storage, and networking capacity so you can choose the appropriate mix for your applications.
select the default option of t2. micro – this instance type is covered within the free tier. Then click on Configure Instance Details.
Click on Configure Instance Details.

Configure Instance Details
Configure EC2 instance details as per requirements of your environment.
Go to IAM role and choose the required role “MyRole” which was created earlier and click on Review and Luanch.

Choose existing Key Pair and Launch Your Instance
To connect to your virtual machine, you need a key pair. A key pair is used to log into your instance and select existing key pair.

click on View Instances to view the instance you have just created and see its status.

We can see our instances
The status Is initializing ( in back end all commands are running ) so, It will take some time.

Connect to Linux Server through Putty
Go to putty tool and enter DNS which was copied earlier from your instance.

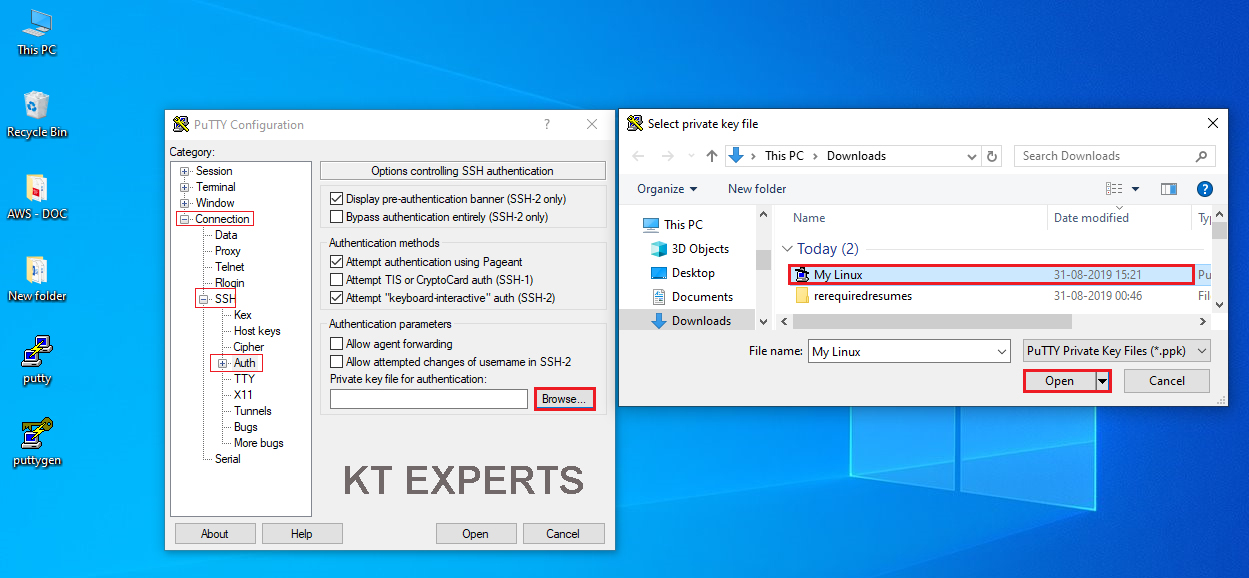
Go to connection at the left side menu then select “SSH” and then select “Auth”. You need to click on the browse button to select the My Linux.ppk file that we created recently.
Click on open.
Click on open.

Ignore warnings and click on yes.
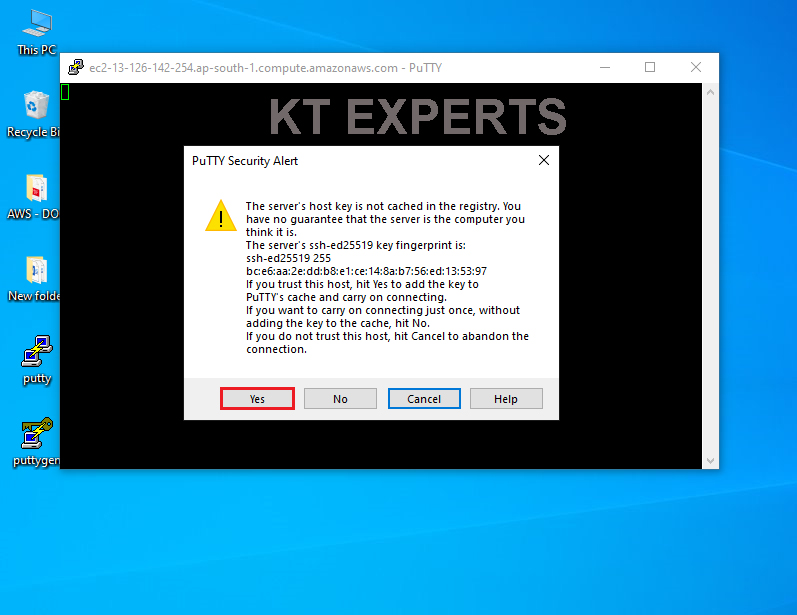
Once you connect, you will successfully see the Linux Server prompt.

|
1 2 3 4 5 6 7 8 9 10 11 12 13 14 15 16 17 18 |
Using username "ec2-user". Authenticating with public key "imported-openssh-key" __| __|_ ) _| ( / Amazon Linux 2 AMI ___|\___|___| https://aws.amazon.com/amazon-linux-2/ [ec2-user@ip-172-31-3-39 ~]$ |
Switch to root user
|
1 2 3 4 |
[ec2-user@ip-172-31-3-39 ~]$ sudo su [root@ip-172-31-3-39 ec2-user]# |
Create an S3 Bucket
|
1 2 3 4 |
[root@ip-172-31-3-39 ec2-user]# aws s3 mb s3://ktexpertsbucket2 make_bucket: ktexpertsbucket2 |
To Check list of S3 Buckets
|
1 2 3 4 5 6 7 8 |
[root@ip-172-31-3-39 ec2-user]# aws s3 ls 2019-09-14 23:50:29 ktexpertsbucket 2019-09-15 01:08:25 ktexpertsbucket1 2019-09-15 12:12:06 ktexpertsbucket2 |
To Verify Buckets Graphically
Go to S3 console in that we can the bucket “ktexpertsbucket2”
In the CLI bucket default access is public.
In the Graphical bucket default access is private.

Copy object from base machine to S3 bucket
Go to object path and run the command
Make file “versioning”
|
1 2 3 4 5 6 |
[root@ip-172-31-3-39 ec2-user]# touch versioning [root@ip-172-31-3-39 ec2-user]# ls versioning |
Copy the object to the bucket
|
1 2 3 4 |
[root@ip-172-31-3-39 ec2-user]# aws s3 cp versioning s3://ktexpertsbucket2/versioning1.txt upload: ./versioning to s3://ktexpertsbucket2/versioning1.txt |
To Verify Graphically
Go to S3 console in that we can see the object “versioning1.txt” in the bucket “ktexpertsbucket2”

Create an IAM User
|
1 2 3 4 |
[root@ip-172-31-3-39 ec2-user]# aws iam create-user --user-name Vinod An error occurred (AccessDenied) when calling the CreateUser operation: User: arn:aws:sts::488295205937:assumed-role/MyRole/i-00d94d6ab62fa39bd is not authorized to perform: iam:CreateUser on resource: arn:aws:iam::488295205937:user/Vinod |
Note :
We can’t access anything apart from S3 because EC2 instance has only AmazonS3FullAccess
If you want to access IAM we need to attach IAM permission to the role “MyRole”
Attach IAM Permission to Role “MyRole”
Go to services and click on IAM under Security,Identity & Compliance.

Go to Roles and choose Role “MyRule”

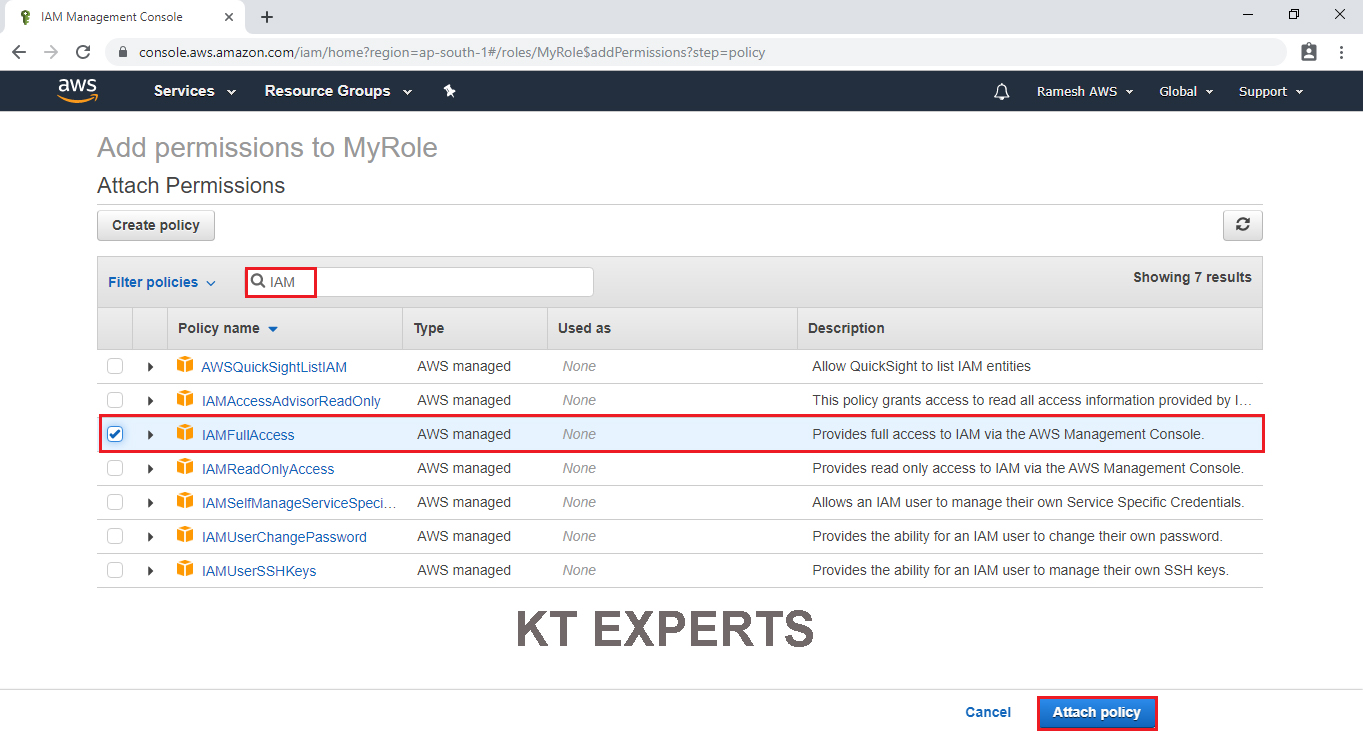
Click on Attach Policies.
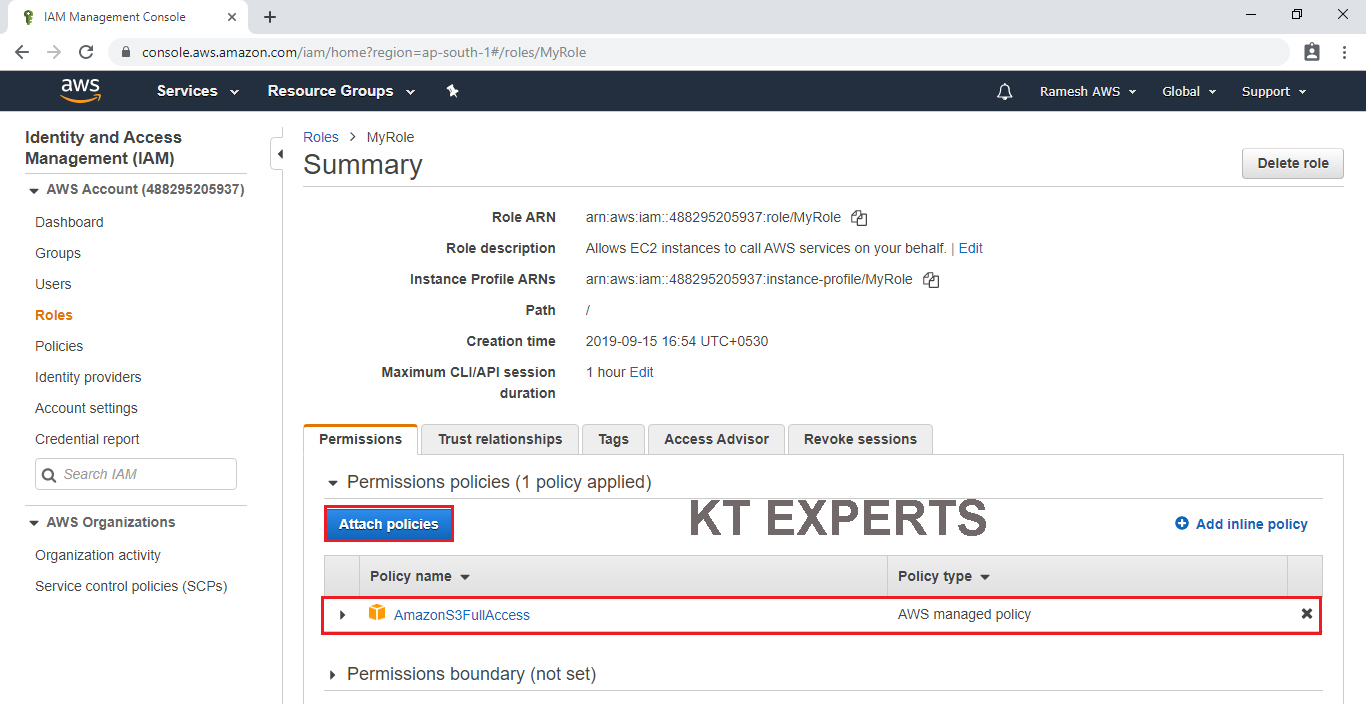
Choose IAMFullAccess by searching “IAM” in the search bar and click on Attach Policy.
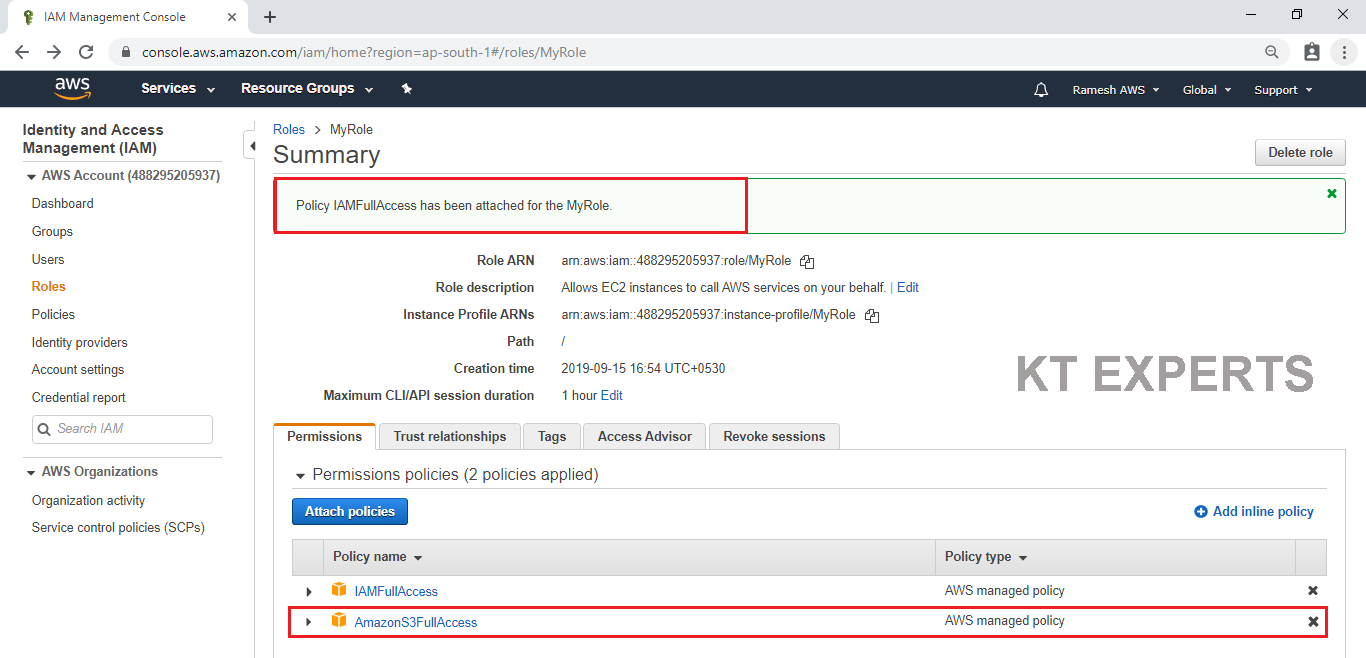
IAMFullAccess policy has been attached to my role “MyRole” successfully.
Create an IAM User
Go to Linux Command Line and create an IAM user.
|
1 2 3 4 5 6 7 8 9 10 11 12 13 14 15 16 17 18 19 20 21 22 |
[root@ip-172-31-3-39 ec2-user]# aws iam create-user --user-name vinod { "User": { "UserName": "vinod", "Path": "/", "CreateDate": "2019-09-15T12:42:08Z", "UserId": "AIDAXDMFJRQY7Y6XFMAOA", "Arn": "arn:aws:iam::488295205937:user/vinod" } } [root@ip-172-31-3-39 ec2-user]# |
To Check Graphically
Go to services and click on IAM under Security,Identity & Compliance.

In the users we can see user ”Vinod” that was created in CLI.

Create an IAM Group
|
1 2 3 4 5 6 7 8 9 10 11 12 13 14 15 16 17 18 19 20 21 22 |
[root@ip-172-31-3-39 ec2-user]# aws iam create-group --group-name ktexperts2 { "Group": { "Path": "/", "CreateDate": "2019-09-15T12:46:10Z", "GroupId": "AGPAXDMFJRQYUPTBQGLOG", "Arn": "arn:aws:iam::488295205937:group/ktexperts2", "GroupName": "ktexperts2" } } [root@ip-172-31-3-39 ec2-user]# |
To Verify Graphically
Go to IAM Dashboard in that we can see the group “ktexperts2” which was created in CLI

Detach Role “MyRole” from EC2 Instance
Go to services and click on EC2 under compute module.

Go to Instances.
Select the instance then go to Actions then click on Attach/Replace IAM Role in the instance settings.

Choose No Role option in the IAM role field.

Click on Apply.

Click on Yes,Detach.

The role “MyRole” has been detached successfully.

Create an IAM User
Go to Linux Command Line and create an IAM user
|
1 2 3 4 |
[root@ip-172-31-3-39 ec2-user]# aws iam create-user --user-name Sai Unable to locate credentials. You can configure credentials by running "aws configure". |
Note : we can see above one error “Unable to locate credentials” because we ditached the role (we don’t have credentials )
If you want to create IAM user you provide credentials manually or Attach Role to EC2 instance
Attach Role “MyRole” to EC2 Instance
Go to services and click on EC2 under compute module.

Go to Instances
Select the instance then go to Actions then click on Attach/Replace IAM Role in the instance settings.

Choose MyRole option in the IAM role field.

Click on Apply.

The role “MyRole” has been Attached successfully.

Create an IAM User
Go to Linux Command Line and create an IAM user
|
1 2 3 4 5 6 7 8 9 10 11 12 13 14 15 16 17 18 19 20 21 22 |
[root@ip-172-31-3-39 ec2-user]# aws iam create-user --user-name Sai { "User": { "UserName": "Sai", "Path": "/", "CreateDate": "2019-09-15T13:31:48Z", "UserId": "AIDAXDMFJRQYRP2IQNGTL", "Arn": "arn:aws:iam::488295205937:user/Sai" } } [root@ip-172-31-3-39 ec2-user]# |
To Check Graphically
Go to services and click on IAM under Security,Identity & Compliance.

In the users we can see user ”Sai” that was created in CLI.

Thank you for giving your valuable time to read the above information. Please click here to subscribe for further updates
KTEXPERTS is always active on below social media platforms.
Facebook : https://www.facebook.com/ktexperts/
LinkedIn : https://www.linkedin.com/company/ktexperts/
Twitter : https://twitter.com/ktexpertsadmin
YouTube : https://www.youtube.com/c/ktexperts
Instagram : https://www.instagram.com/knowledgesharingplatform


