
Dear Readers,
In this article, we will see the Create Web Server in AWS.

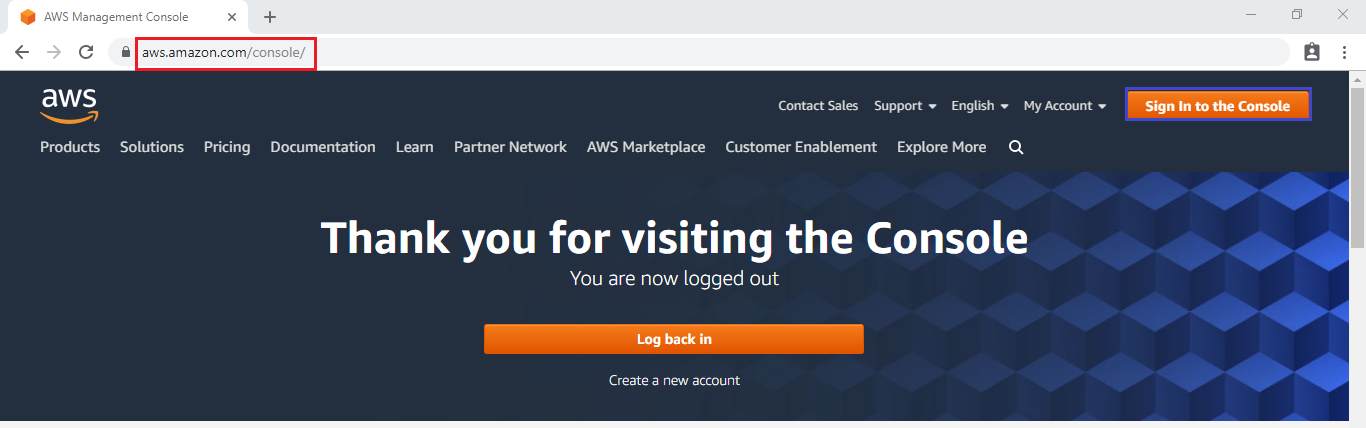
STEP 1:
First, we need to AWS Console page by using below link.
https://aws.amazon.com/console/
Click on sign in to Console button.
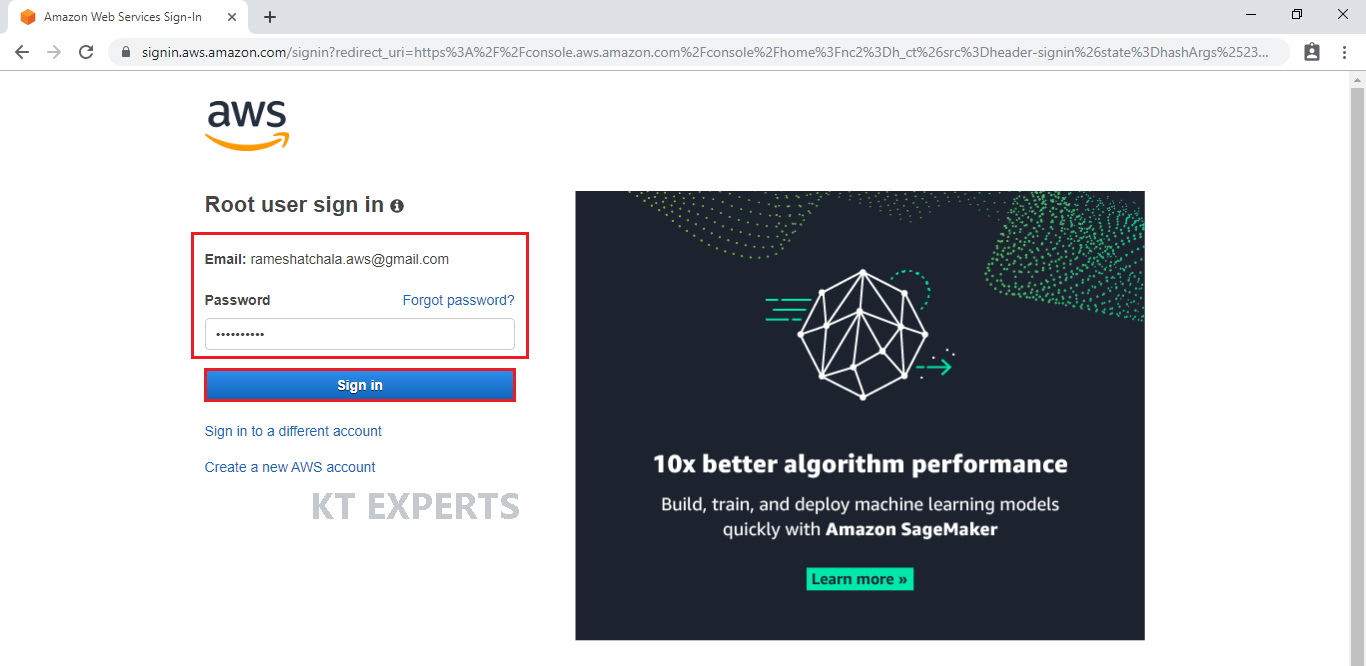
STEP 2:
Logging to aws account
Provide username and password then click on sign in.
STEP 3:
Enter into AWS Management Console Dashboard
We can see the AWS Management Console Dashboard.

Go to Services, under the compute module click on EC2 service to open.
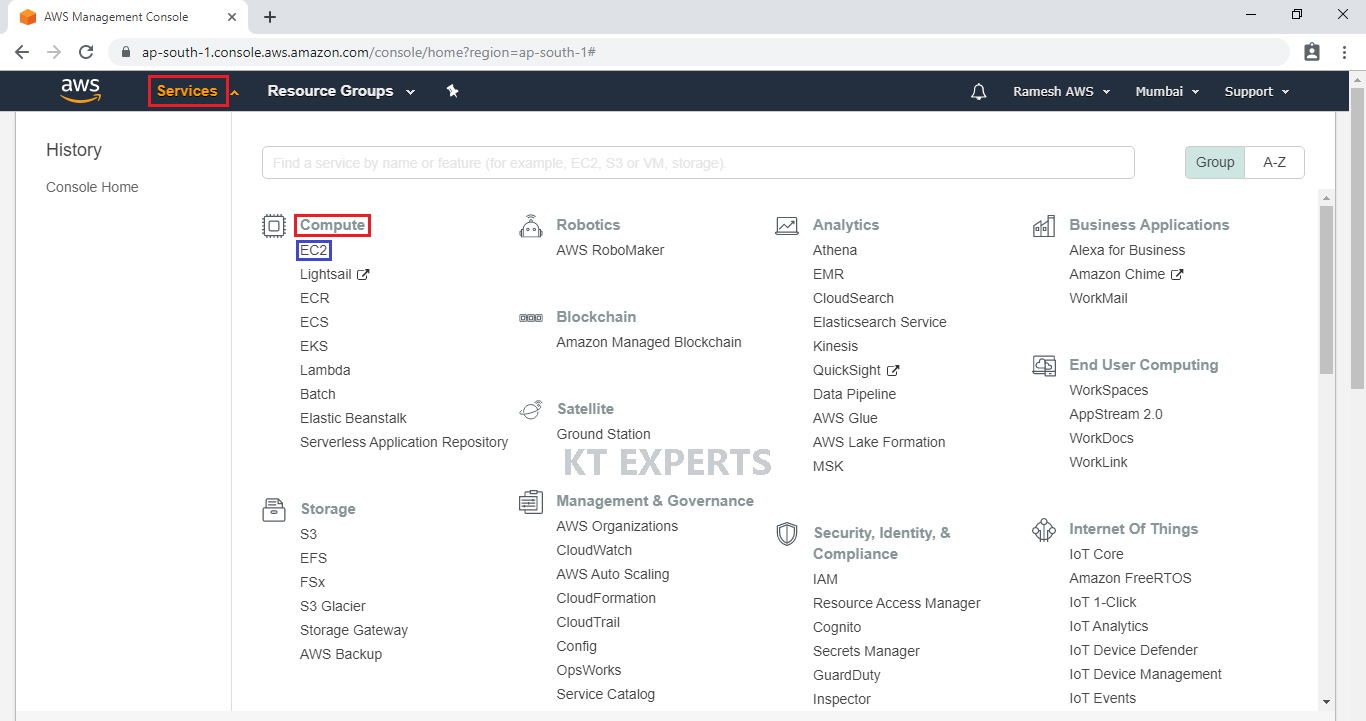
Use below link to create Linux Ec2 instance in AWS.
It will be displayed EC2 – Dashboard and click on Running Instances.

STEP 4:
Connect to Your Instance
In order to connect to your Windows virtual machine instance, you will need a third-party tool like putty
Copy the public DNS for connect your instance through putty.
Go to putty tool and enter DNS which was copied earlier from your instance.

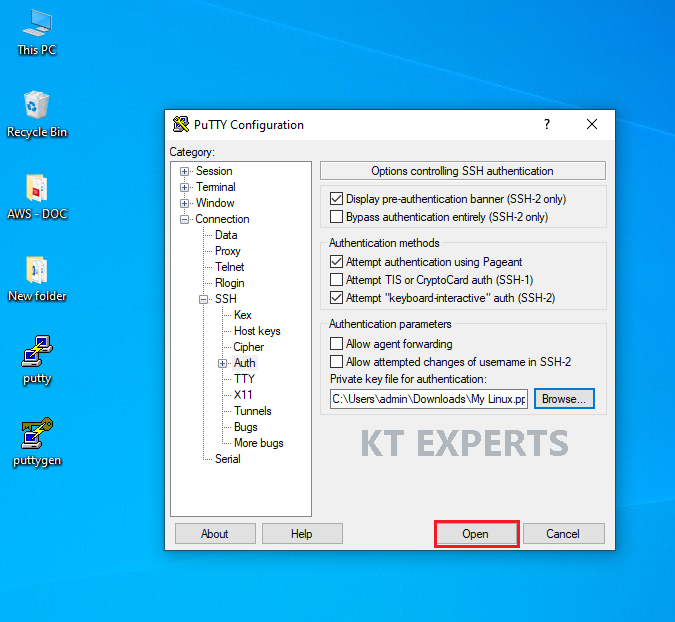
Go to connection at the left side menu then select “SSH” and then select “Auth”. You need to click on the browse button to select the My Linux.ppk file that we created recently.
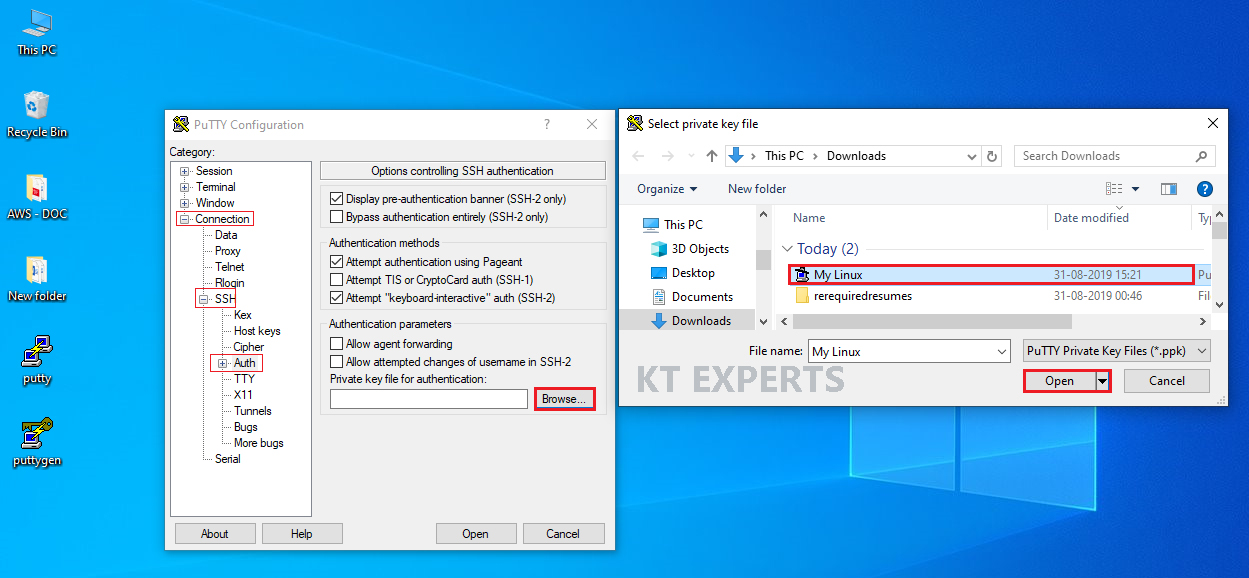
Click on open.
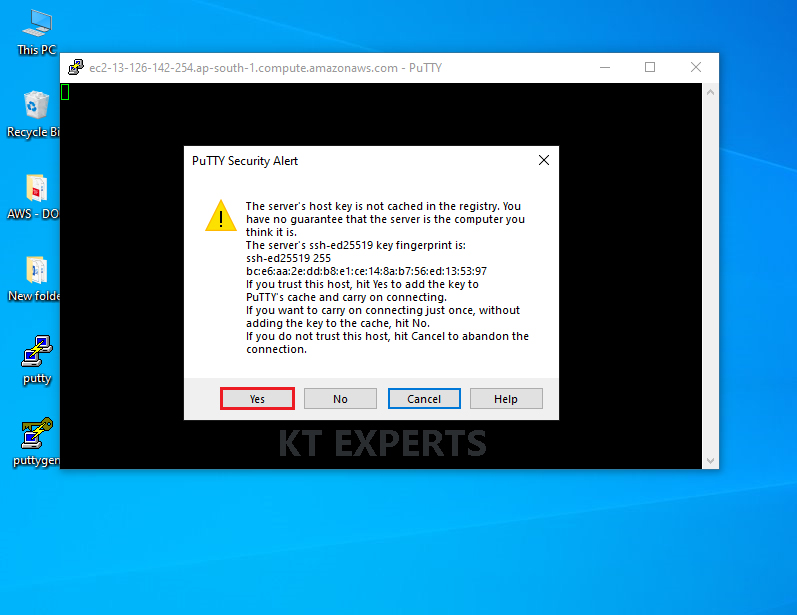
Ignore warnings and click on yes.
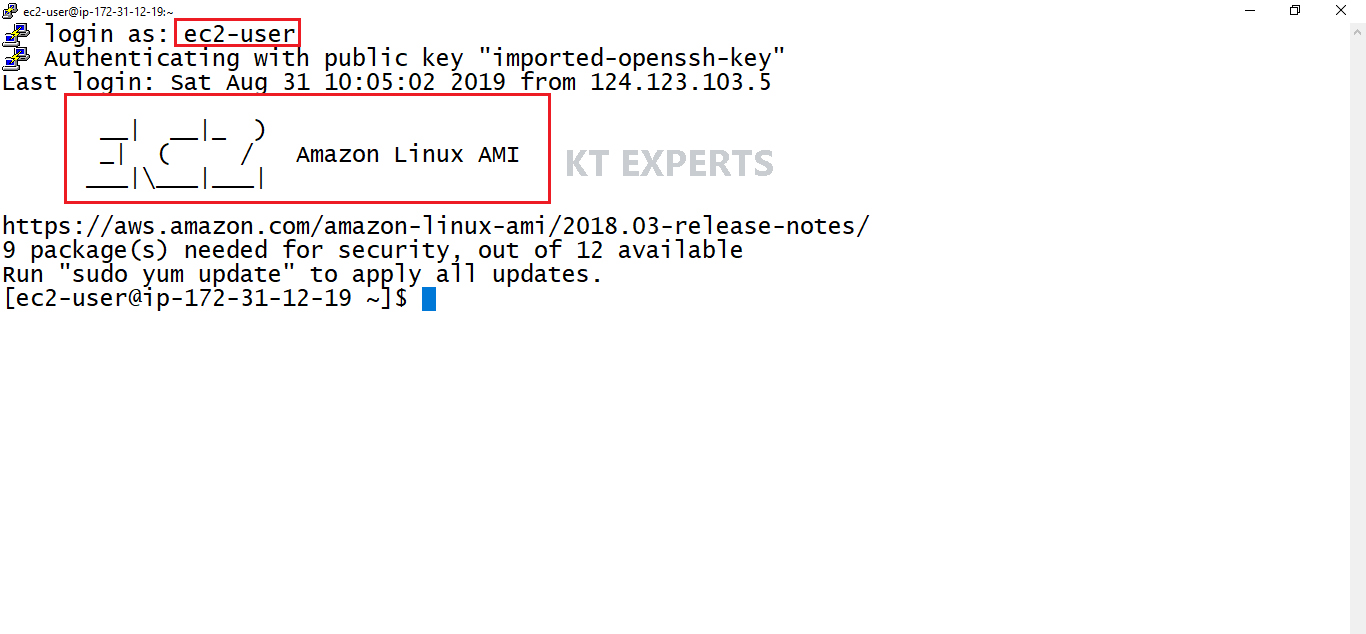
Once you connect, you will successfully see the Linux Virtual Server Terminal.
STEP 5:
we have to run some Commands to Convert from Linux Server to Web Server
- sudo su
- yum update -y
- yum install httpd -y
- cd /var/www/html
- echo “ktexperts is a knowledge sharing platform” > index.html
- ls
- service httpd start
- chkconfig httpd on
Logging to Linux Server
|
1 2 3 4 5 6 7 8 9 10 11 12 13 14 |
Provide username “ec2-user” login as: ec2-user Authenticating with public key "imported-openssh-key" Last login: Sat Aug 31 10:05:02 2019 from 124.123.103.5 __| __|_ ) _| ( / Amazon Linux AMI ___|\___|___| https://aws.amazon.com/amazon-linux-ami/2018.03-release-notes/ 9 package(s) needed for security, out of 12 available Run "sudo yum update" to apply all updates. |
STEP 6:
Switch normal user “ec2-user” to root user “root”
|
1 2 3 4 |
[ec2-user@ip-172-31-12-19 ~]$ sudo su [root@ip-172-31-12-19 ec2-user]# |
STEP 7:
Update all the packages in current available version
We update all the packages at once per one server
If you mention -y it will do all the updates automatically otherwise it will wait until hit enter y(yes)
|
1 2 3 4 5 6 7 8 9 10 11 12 13 14 15 16 17 18 19 20 21 22 23 24 25 26 27 28 29 30 31 32 33 34 35 36 |
[root@ip-172-31-12-19 ec2-user]# yum update -y Loaded plugins: priorities, update-motd, upgrade-helper amzn-main | 2.1 kB 00:00:00 amzn-updates | 2.5 kB 00:00:00 Resolving Dependencies --> Running transaction check ---> Package amazon-ssm-agent.x86_64 0:2.3.274.0-1.amzn1 will be updated ---> Package amazon-ssm-agent.x86_64 0:2.3.662.0-1.amzn1 will be an update ---> Package curl.x86_64 0:7.61.1-7.91.amzn1 will be updated ---> Package curl.x86_64 0:7.61.1-11.91.amzn1 will be an update ---> Package dbus.x86_64 1:1.6.12-14.28.amzn1 will be updated Downloading packages: (1/12): curl-7.61.1-11.91.amzn1.x86_64.rpm | 363 kB 00:00:00 (2/12): dbus-libs-1.6.12-14.29.amzn1.x86_64.rpm | 154 kB 00:00:00 (3/12): dbus-1.6.12-14.29.amzn1.x86_64.rpm | 387 kB 00:00:00 tzdata.noarch 0:2019a-1.71.amzn1 tzdata-java.noarch 0:2019a-1.71.amzn1 Complete! |
STEP 8:
In the Linux by default we get some directories with operating system
One of default directories is /var/
Check the /var/ Directory
|
1 2 3 4 5 6 7 8 9 10 11 12 13 14 15 16 17 18 |
[root@ip-172-31-12-19 ~]# cd / [root@ip-172-31-12-19 /]# ls bin dev lib lost+found opt run srv usr boot etc lib64 media proc sbin sys var cgroup home local mnt root selinux tmp [root@ip-172-31-12-19 /]# cd var [root@ip-172-31-12-19 var]# ls account db games lib lock mail opt run tmp cache empty kerberos local log nis preserve spool yp |
STEP 9:
Install web package
The name of web package is httpd
Httpd – Hypertext Transfer Protocol Daemon
HTTP Daemon is a software program that runs in the background of a web server and waits for the incoming server requests. The daemon answers the request automatically and serves the hypertext and multimedia documents over the Internet using HTTP
|
1 2 3 4 5 6 7 8 9 10 11 12 13 14 15 16 17 18 19 20 21 22 23 24 25 26 27 28 29 30 31 32 33 34 35 36 37 38 39 40 41 42 43 44 45 46 47 48 |
[root@ip-172-31-12-19 ec2-user]# yum install httpd -y Loaded plugins: priorities, update-motd, upgrade-helper Resolving Dependencies --> Running transaction check ---> Package httpd.x86_64 0:2.2.34-1.16.amzn1 will be installed Downloading packages: (1/5): apr-util-1.5.4-6.18.amzn1.x86_64.rpm | 99 kB 00:00:00 (2/5): apr-1.5.2-5.13.amzn1.x86_64.rpm | 118 kB 00:00:00 (3/5): apr-util-ldap-1.5.4-6.18.amzn1.x86_64.rpm | 19 kB 00:00:00 ------------------------------------------------------------------------------------------------ Total 2.2 MB/s | 1.5 MB 00:00:00 Running transaction check Running transaction test Transaction test succeeded Running transaction Installing : apr-1.5.2-5.13.amzn1.x86_64 1/5 Installing : apr-util-1.5.4-6.18.amzn1.x86_64 2/5 Installed: httpd.x86_64 0:2.2.34-1.16.amzn1 Dependency Installed: apr.x86_64 0:1.5.2-5.13.amzn1 apr-util.x86_64 0:1.5.4-6.18.amzn1 apr-util-ldap.x86_64 0:1.5.4-6.18.amzn1 httpd-tools.x86_64 0:2.2.34-1.16.amzn1 Complete! |
STEP 10:
After installing web package two directories will be created in /var/ directory
www directory will be created in /var/ directory
html directory will be created in /www/ directory
STEP 11:
Check the /www/, /html/ directories
cd – change directory
clear – clear the screen
|
1 2 3 4 5 6 7 8 |
[root@ip-172-31-12-19 ec2-user]# cd /var/www/html [root@ip-172-31-12-19 html]# [root@ip-172-31-12-19 html]# clear [root@ip-172-31-12-19 html]# |
Create a file “index.html” in the /html/ directory and put required content
echo command in Linux is used to display line of text/string that are passed as an argument
|
1 2 3 4 5 6 7 8 9 10 |
[root@ip-172-31-12-19 html]# echo "ktexperts is a knowledge sharing platform" ktexperts is a knowledge sharing platform output “ ktexpers is knowledge sharign platform “ redirected to one output file called “index.html” >(greater than ) --- redirected symbol [root@ip-172-31-12-19 html]# echo "ktexpers is knowledge sharing platform" > index.html |
STEP 13:
Verify index.html file
Verify index.html file in /html/ Directory whether it was created or not
|
1 2 3 4 5 6 |
[root@ip-172-31-12-19 ec2-user]# cd /var/www/html [root@ip-172-31-12-19 html]# ls index.html |
STEP 14:
Start the service
|
1 2 3 4 |
[root@ip-172-31-12-19 html]# service httpd start Starting httpd: [ OK ] |
If you run this command once whenever you restart your machine the service starts automatically
|
1 2 |
[root@ip-172-31-12-19 html]# chkconfig httpd on |
Note: If you don’t run this command whenever restarts the machine, we need to start the service manually
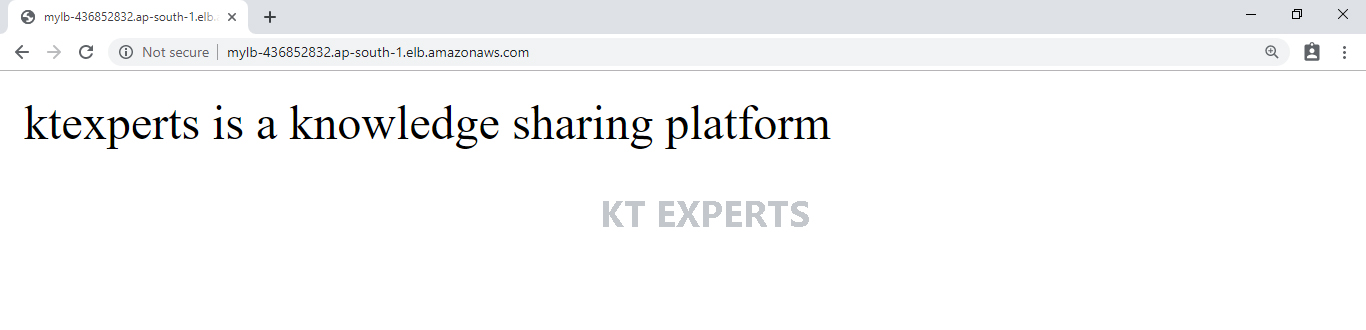
STEP 15:
Take Public DNS (IPv4) / IPv4 Public IP and search in browser URL
Copy the either Public DNS (IPv4) or IPv4 Public
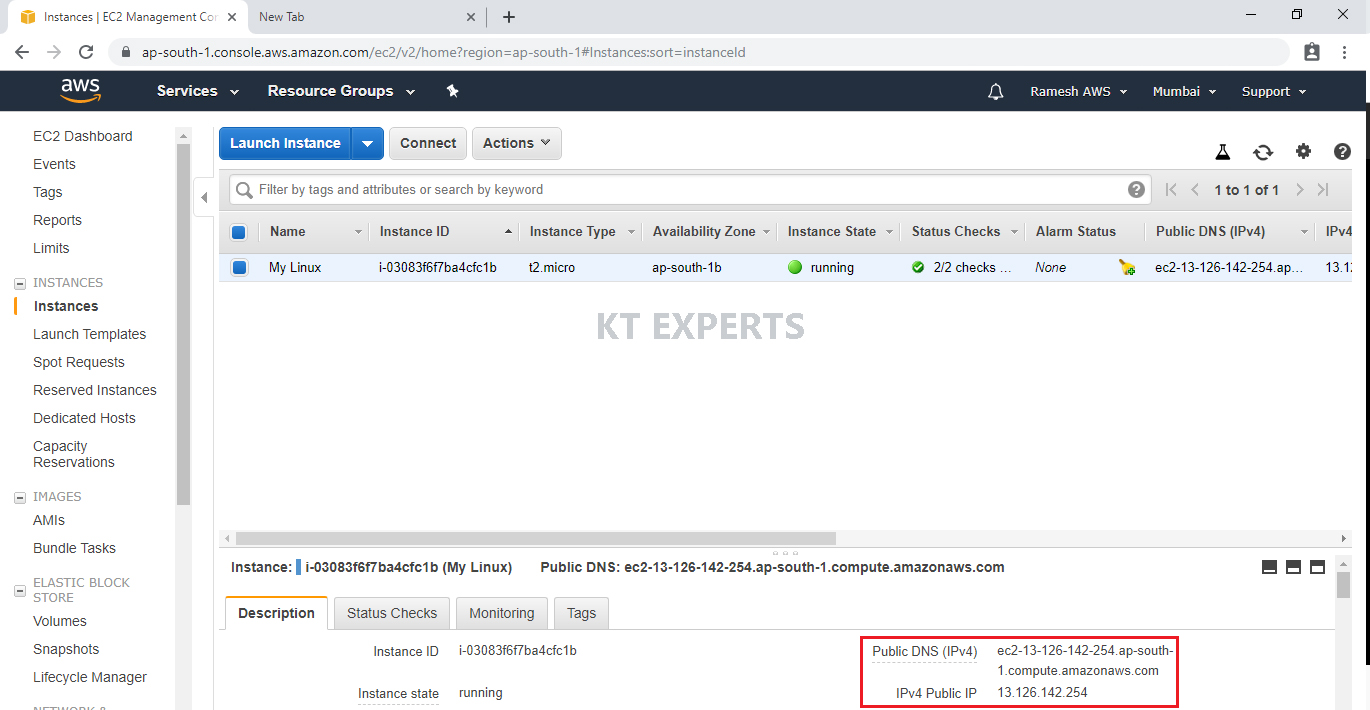
Search in browser URL.
We can’t get the content of web server because lack of HTTP Port.
When you enter Public DNS (IPv4) or IPv4 Public in browser.
Your request is going to web server but it’s not going to inside the web server.
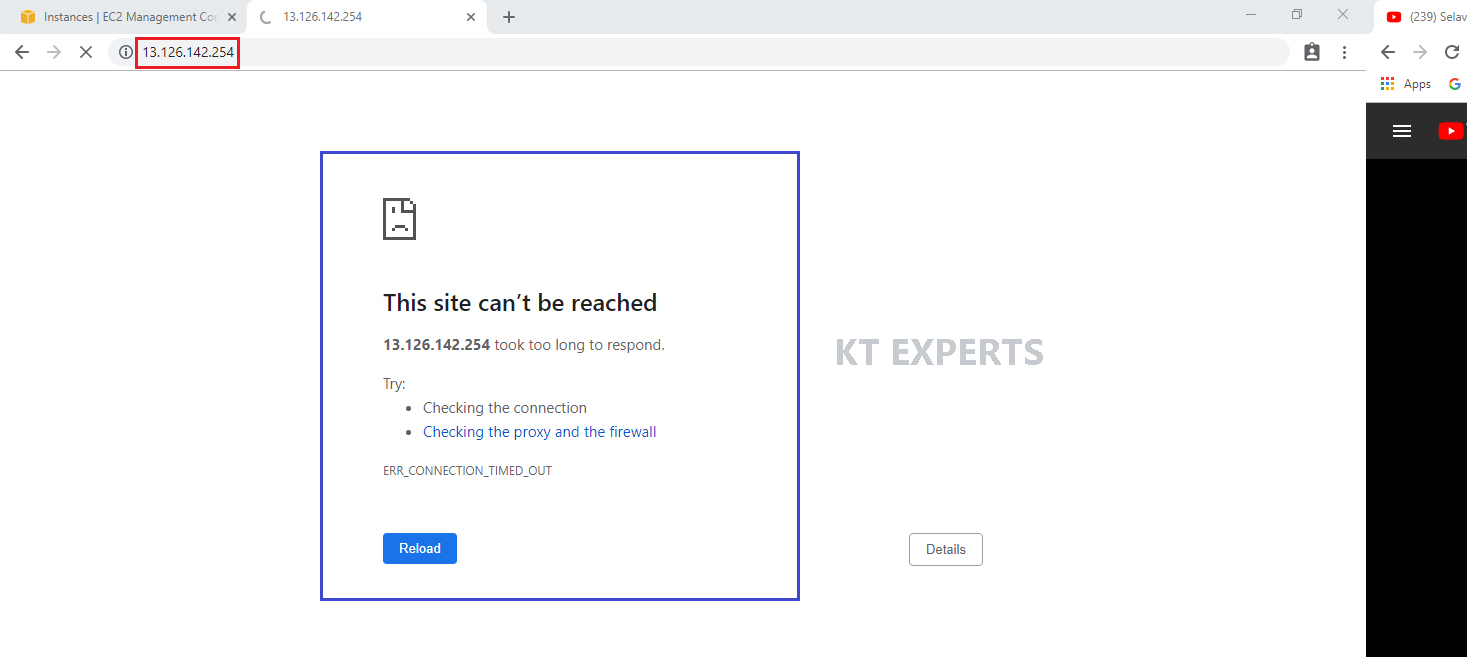
We Need HTTP port “the request is going to inside the webserver and coming back then content will be displayed”.
SSH – It will help us to request go inside physically and run the commands
HTTP – It will help us to access your website through internet
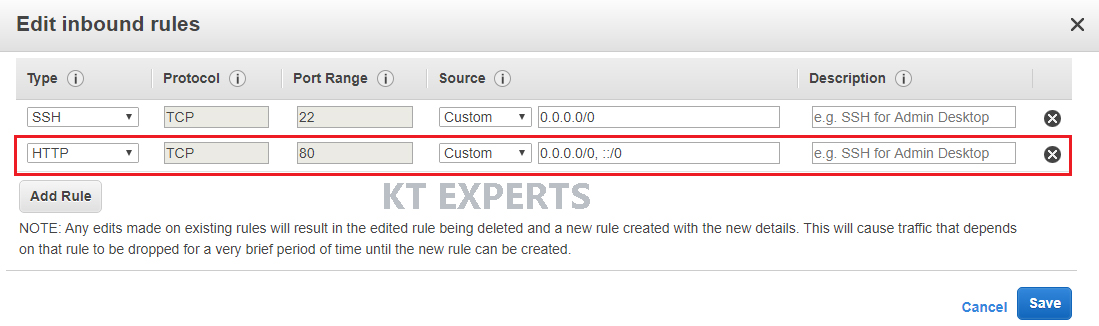
STEP 16:
Add HTTP Port
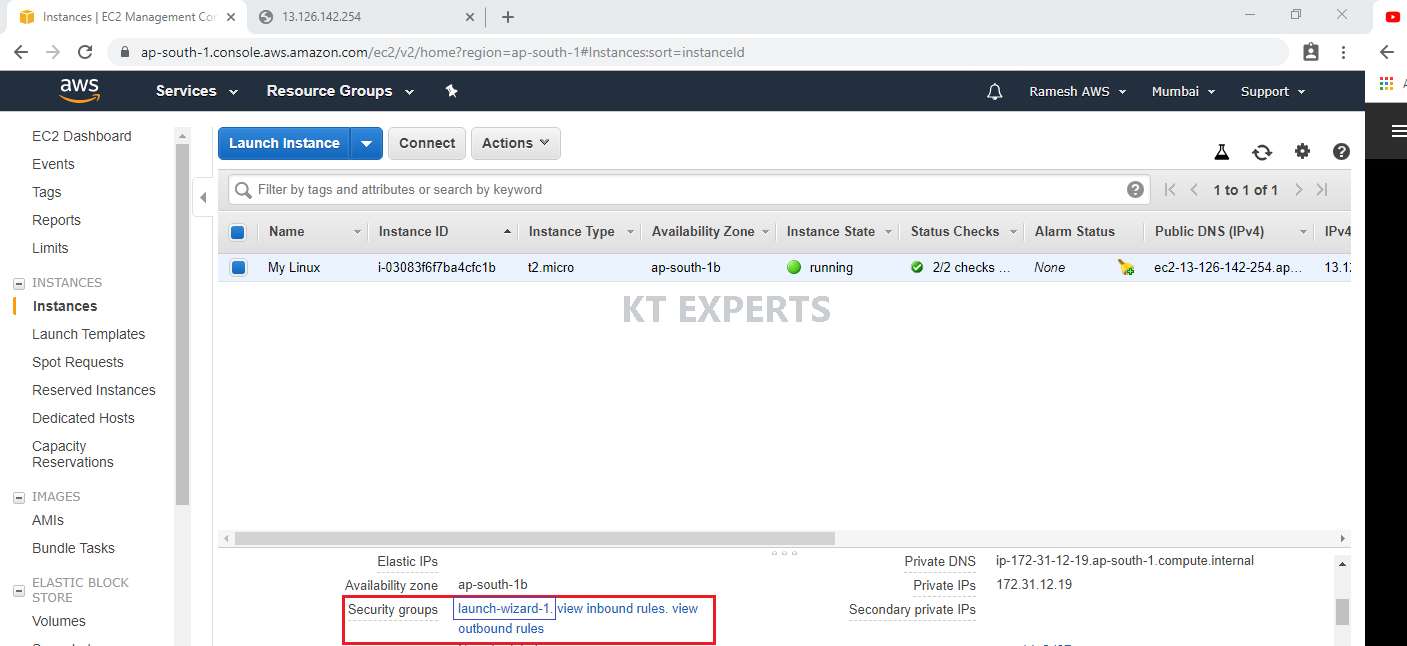
Go to security groups at bottom of your Linux server and click on launch–wizard 1.
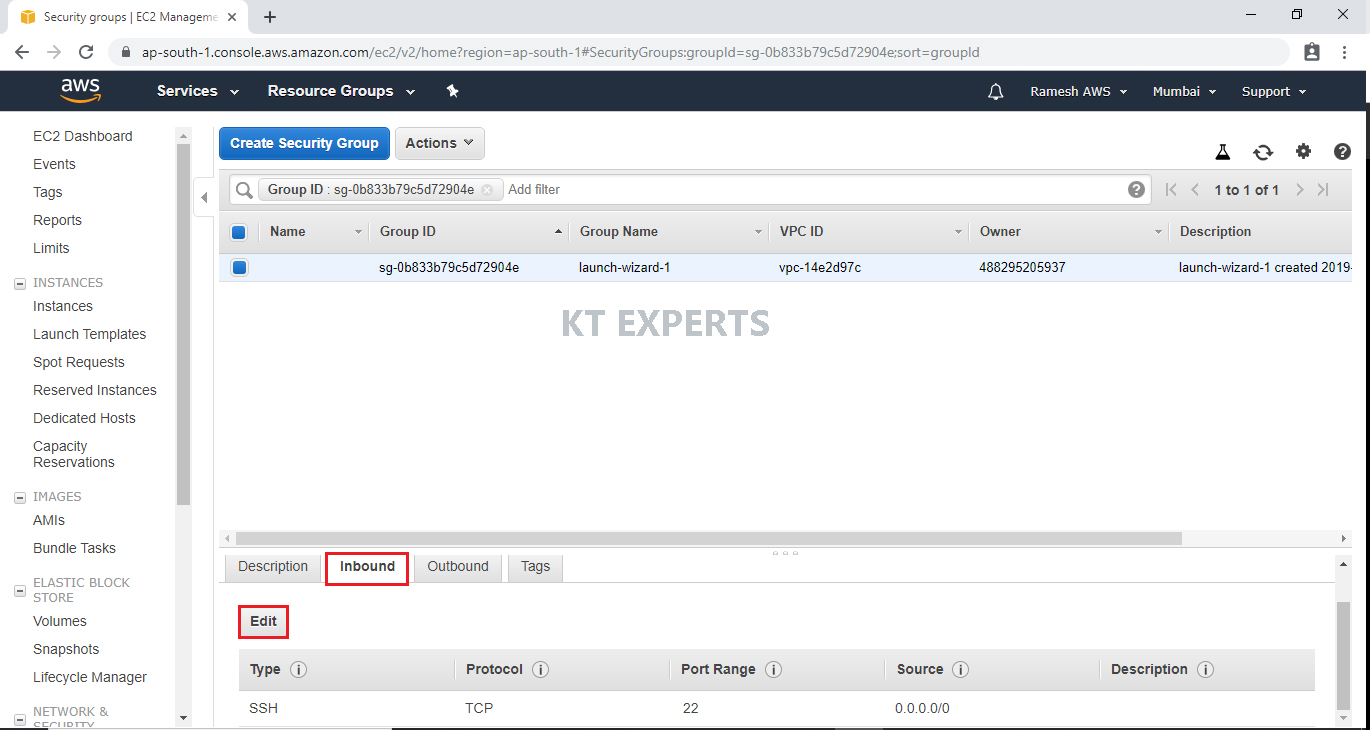
Go to Inbound and click on edit.
STEP 17:
Add security Group
Click on Add Rule.
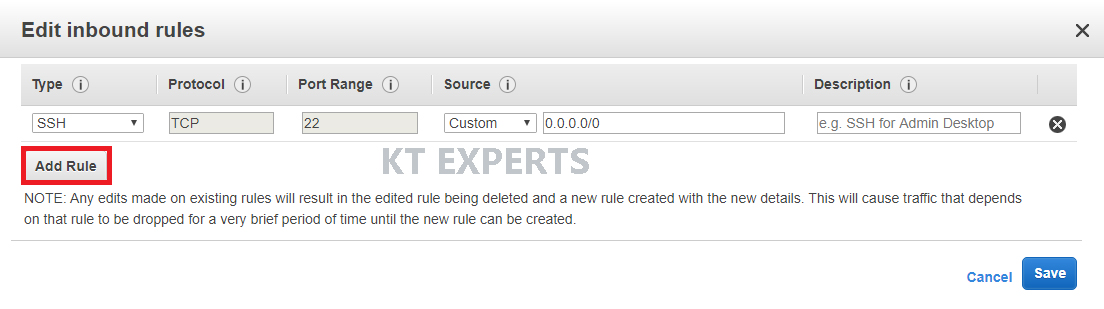
Choose HTTP Port.
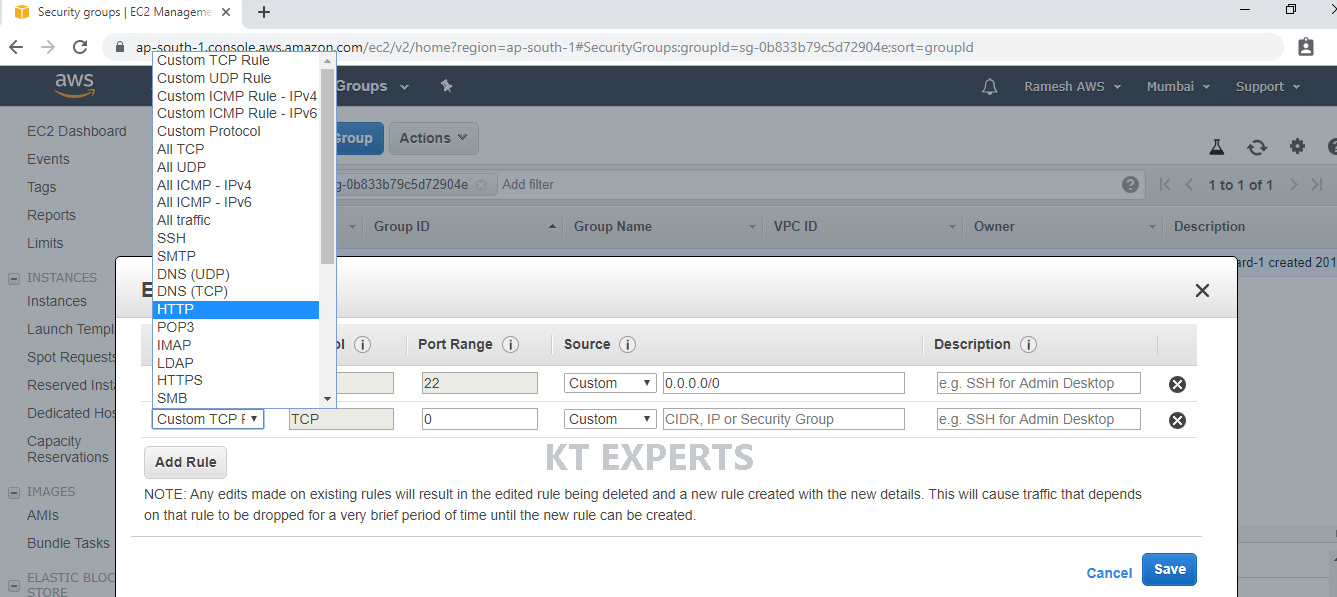
Click on save.
STEP 18:
Take Public DNS (IPv4) / IPv4 Public IP and search in browser URL
Copy the either Public DNS (IPv4) or IPv4 Public in browser.
We can able to see the content anywhere in the world.
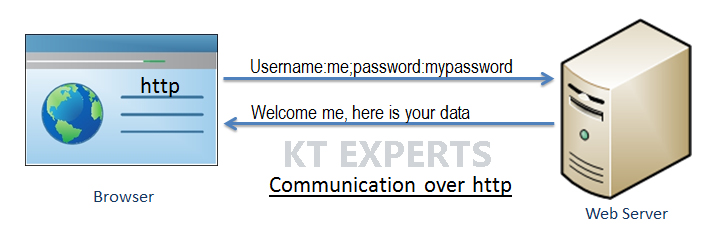
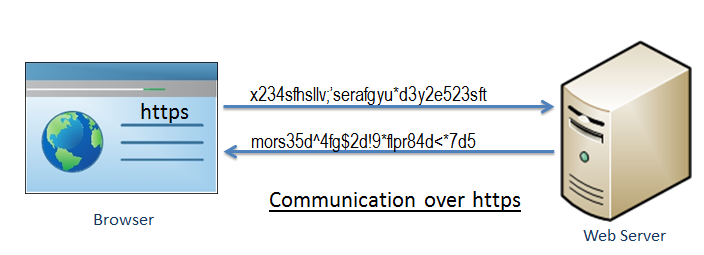
HTTP
HTTP stands for Hypertext Transfer Protocol. It is a protocol for to communication between two systems e.g. the browser and the web server.
http transfers data between the browser and the web server in the hypertext (We can read) format
HTTPS
HTTPS stands for Hypertext Transfer Protocol Secure. It is a protocol for securing the communication between two systems e.g. the browser and the web server.
https transfers data between the browser and the web server in the encrypted (we can’t read) format.
Thank you for giving your valuable time to read the above information. Please click here to subscribe for further updates
KTEXPERTS is always active on below social media platforms.
Facebook : https://www.facebook.com/ktexperts/
LinkedIn : https://www.linkedin.com/company/ktexperts/
Twitter : https://twitter.com/ktexpertsadmin
YouTube : https://www.youtube.com/c/ktexperts
Instagram : https://www.instagram.com/knowledgesharingplatform


Thulasi Ram
Great Job!!!!!!!
Nayab
Very good effort ramesh achatla. Hope u create more web pages and help us in gaining more knowledge
k. sai chaitanya
Thank for sharing Ramesh!!!!!!!!!!!!!!